
How-To: Pass variables between Flask(python) and javascript
Reading Time:
Reading Time:

In web development, there are a multitude of technologies and frameworks that can be used for frontend and backend development. The combination of technologies used for front end and back end can vary depending on the specific requirements of the project. Some of the most common frontend and backend technology combinations include:
In this tutorial, we will be using Flask and JavaScript for the backend and front end, respectively. This choice of technologies is based on the author's familiarity with the Python programming language, which Flask is built upon. However, it's important to note that there are many other combinations of frontend and backend technologies available and the choice ultimately depends on the specific needs of the project.
Install Flask if you haven't yet--preferably in a virtual environment : pip install flask
Create a new directory and create a file app.py with the following code
from flask import Flask, render_template, request

app = Flask(__name__)

@app.route('/')
def index():
    return render_template('index.html')

if __name__ == '__main__':
    app.run(debug=True)
Create a templates directory in the same directory as app.py and create a file index.html with the following code:
<html>
  <head>
    <script>
      function sendData() {
        var input = document.getElementById("input").value;
        console.log(input);
      }
    </script>
  </head>
  <body>
    <input type="text" id="input" />
    <button onclick="sendData()">Send Data</button>
  </body>
</html>
Run the Flask application with python app.py. You should be able to access the web application at http://localhost:5000/.
Once you start the Flask application using python app.py in the terminal, you should see a notice that the application is running and listening on a specific web address, usually http://localhost:5000/. This means that the application is now ready to receive and process requests from the front end. It's important to note that while the Flask application is running, any changes made to the files will be automatically reflected in the application. This allows for a quicker development process, as you can test the changes made to the application without having to stop and restart the application each time.
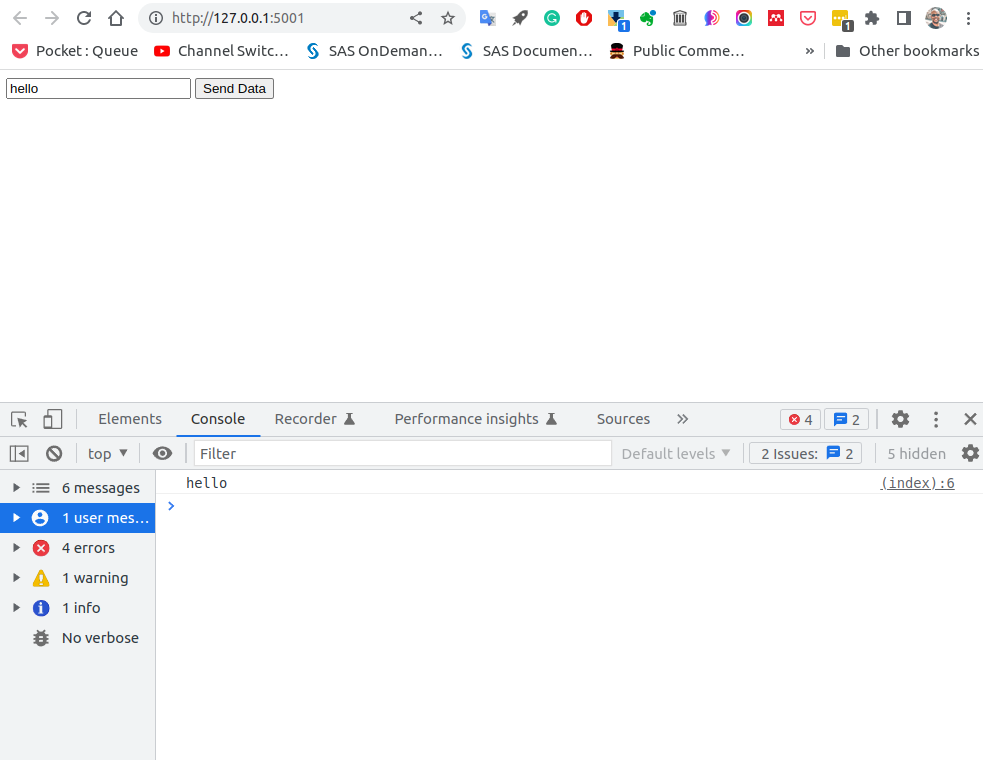
If you access the window, and you are using chrome, opening the developer tools, and hitting the console tab you would see your text entry there. So the javascript function sendData() in the script tagindex.html creates a variable from the textbox and sends it to the console.
Now to pass data from JavaScript to Flask, you can make an HTTP request to a Flask endpoint. Add the following endpoint to app.py:
@app.route('/data', methods=['POST'])
def data():
    data = request.get_json()
    print(data)
    return 'Data received'
In index.html, modify the sendData function to make a POST request to the Flask endpoint when the button is clicked:
<html>
  <head>
    <script>
      function sendData() {
        var input = document.getElementById("input").value;
        fetch("/data", {
          method: "POST",
          headers: {
            "Content-Type": "application/json",
          },
          body: JSON.stringify({ data: input }),
        })
          .then((response) => response.text())
          .then((data) => {
            console.log(data);
          });
      }
    </script>
  </head>
  <body>
    <input type="text" id="input" />
    <button onclick="sendData()">Send Data</button>
  </body>
</html>
Remember any modifications to the files will update the app while it runs. Refresh the web page and enter some text in the input field. Click the button to send the data to Flask. You should see the data logged in the Flask console.
We have successfully created a form in the frontend using JavaScript and passed the entered data to the backend in the form of a Python variable, it's time to move on to the next step. We will take the Python variable and send it back to the frontend, completing the full cycle of passing data between the frontend and backend.
First, we are going to modify our HTML file to rename the button text to "Say Hello" and to give a tag for the python variable that will be created every time the button is pressed
<html>
  <head>
    <script>
      function sendData() {
        var input = document.getElementById("input").value;
        fetch("/data", {
          method: "POST",
          headers: {
            "Content-Type": "application/json",
          },
          body: JSON.stringify({ data: input }),
        })
          .then((response) => response.text())
          .then((data) => {
            console.log(data);
            document.getElementById("data").innerHTML = data;
          });
      }
    </script>
  </head>
  <body>
    <input type="text" id="input" />
    <button onclick="sendData()">Say Hello</button>
    <p id="data"></p>


  </body>
</html>
Modify the following endpoint to app.py to handle the POST request from JavaScript:
@app.route("/data", methods=["POST"])
def data():
    data = request.get_json()
    print(data)
    data_str = str(data["data"])
    return f'<p id="data">Hello, {data_str}!</p>'
The newly modified data()function takes the value of the "data" key from the JSON object and stores it in a string variable. Finally, it logs the response from the server in the console and displays it on the webpage using inner HTML which will update the <p> tag.
In conclusion, this tutorial demonstrates the process of passing data between the front end and back end using Flask and JavaScript. We covered how to create a simple form in the front end and send the data to the backend using built in fetch function in javascript. We also showed how to process the data in the backend using Flask and return the result to the front end for display. By following this tutorial, you should now have a basic understanding of how to pass data between the front end and back end in a web application.
As a challenge, try to create an app that takes a variable, sends it to python, performs a calculation on the variable, and then sends it back to the front end perform another calculation and display the result on the page. This will require you to modify the JavaScript code to send the variable to the Flask endpoint, modify the Flask endpoint to perform the calculation, and modify script on the HTML file to calculate and display the result. Good luck!

